We shall not cease from exploration
And the end of all our exploring
Will be to arrive where we started
And know the place for the first time.
"Little Gidding"
T S Eliot
Showing posts with label Airdry clay. Show all posts

Wednesday, 20 March 2019

One step forward ...

two steps back!

Sooo frustrating trying to move, my buyer has now lost her buyer, so everything back on hold and I don't know whether the house I want will still be available once a chain has reformed.  Anyway, my property is back on the market ...  arrggghhhh - need to keep it tidy again!

So, very little happening on the creative front, but the Fearless Four did get together recently to finish a project we started some weeks ago.

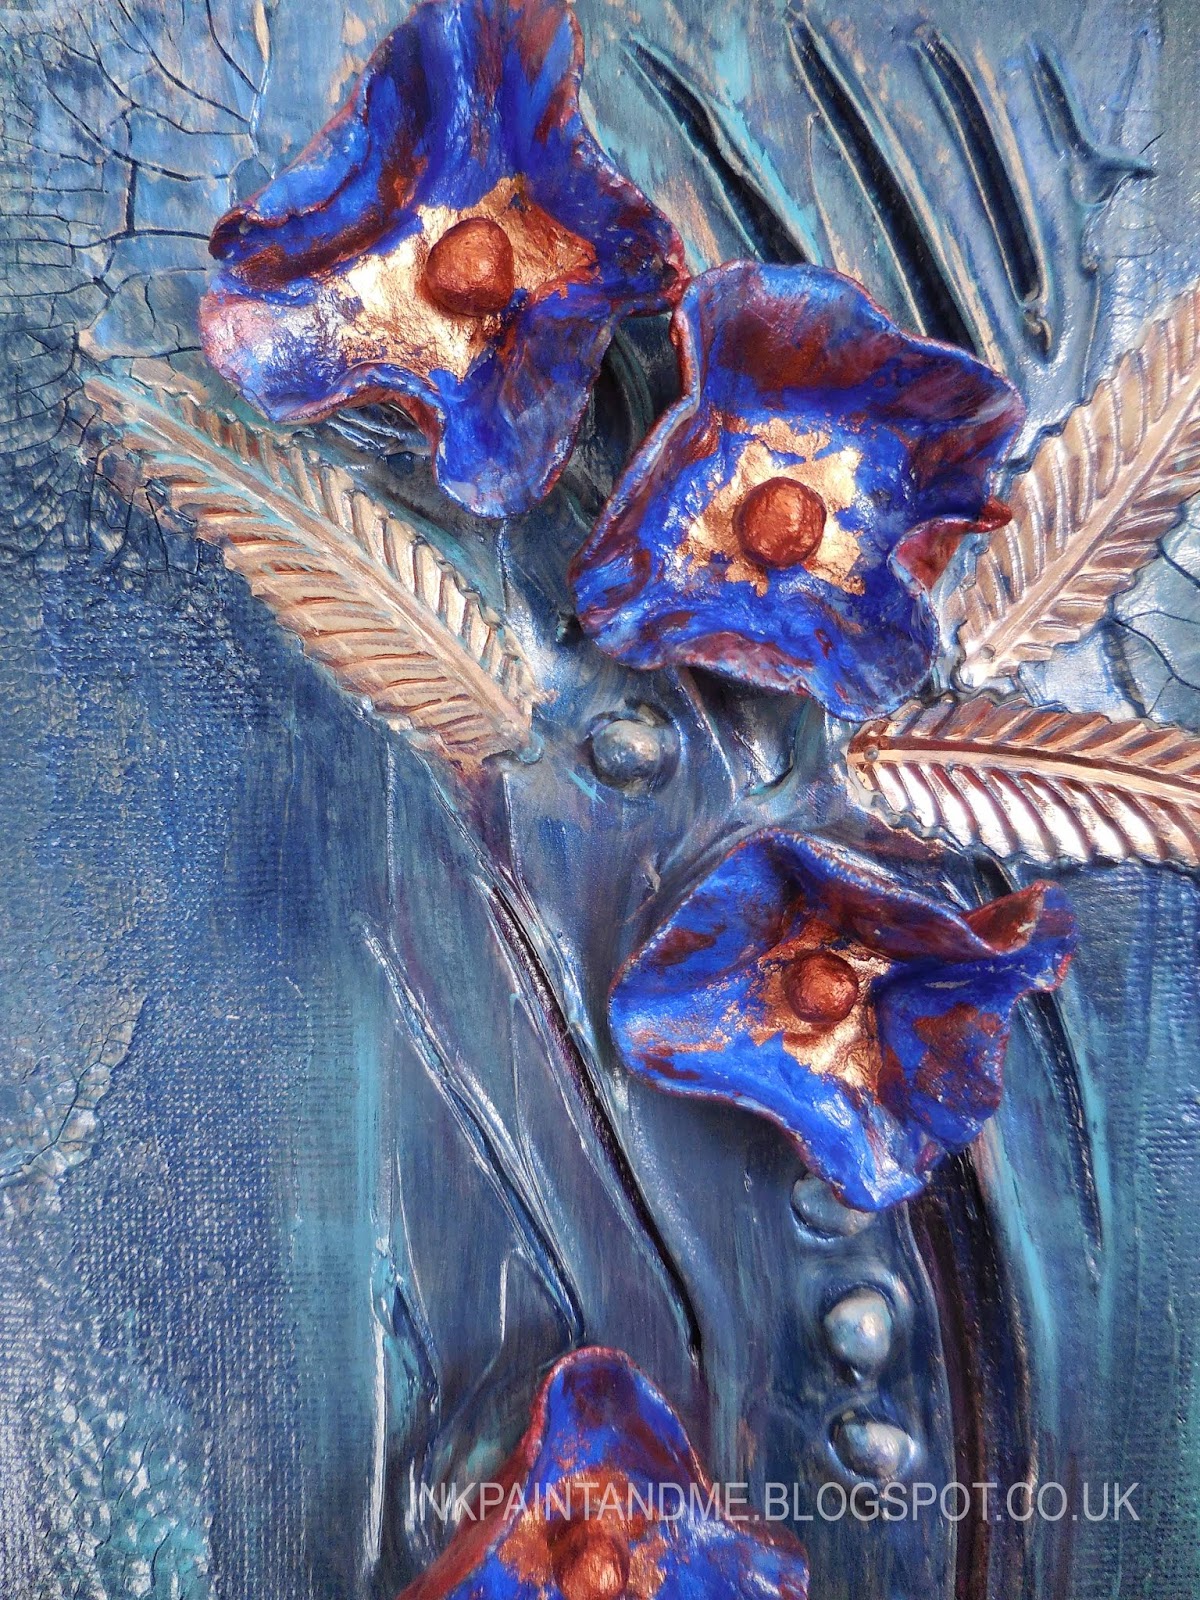
You may recall the clay flowers I made (see here).  I made some more, to use on our project which was to create a very 3D canvas.

Because we were using a lot of modelling paste etc. it needed to thoroughly dry - hence our second get together to finish off.

I forgot to take a photo after stage one! So here is my completed canvas. A long thin one, which I don't often use.

Ingredients include thick modelling paste, crackle paste, acrylic paint, gilding flakes; the copper leaves I've had for many years, and finally I've used some - though there are lots left!


Here is a bit of a close-up ...


The others managed to do two projects each -

Linda used some pieces from old potpourri!

Lin used some clay pieces and also some of Linda's potpourri!

Monica has used clay pieces, fabric and also some of the potpourri ...

Another fun day with friends.


Thursday, 24 November 2016

My sister and me ...

My sister, Laura, is a wood turner, making all sorts of (mainly small) delicious things. Her lathe is in a 6 x 4 unheated shed, which can prove problematic in the winter months! She has recently set up an Etsy shop, so you can see her creations here.

Anyway, at the end of each session on her trusty lathe, there is this small disc of wood, which she polishes and puts into a little box.

Well - I couldn't pass up the challenge of doing something with them!

I've used a wooden box frame, with acrylic paint for the background, a bit of texture created with the gesso layer, and copper gilding wax. The tree truck is made from fabric dunked in fabric hardener (Powertex). I've also added a little airdry clay owl. We called this creation Watcher in the Wood ...


Since Laura has been wood turning, I've learned so much about wood, and the amazing array of colours you find beneath the bark.

Sticking with a tree theme, this from Emily Dickinson makes me smile -

Not at Home to Callers
Says the Naked Tree -
Bonnet due in April -
Wishing you Good Day -


Thursday, 16 October 2014

A little bird told me .....

I've been working on this canvas, on and off, for a couple of weeks.  I've used my favourite wood canvas - my last one, so must get some more!


For the background I've used pieces of textured ribbon, with modelling paste and texture paste.


I also prepared some paper clay faces, using a mould, and hand cut neck and shoulders.


I then experimented with bits of fabric, and hand made papers.

I stiffened some loose weave fabric with Paverpol, but watered down PVA works just as well.

The handmade paper I have is quite soft and easily moulded, so used Paverpol on that too.

The hair is made from a selection of different fibres.

Everything is painted in neutral shades, but .....


..... to finish, I wanted a little bit of colour - so - and I am sure you can guess - yes - my personal mantra which I find hard to ignore - a bluebird!

I also added a little gold mica.


And I've still got another head and shoulders to do another canvas, - I can't guarantee that another bluebird will not  alight somewhere!

Friday, 18 April 2014

Everything is Very 3D!

Recently I led a workshop on my favourite technique, using a mix of 3D bits and pieces on a firm substrate, and bringing it all together with paint!

It was a beautiful sunny day, and the room we used was fabulous - very light and airy. The morning was spent designing, bringing everything together, and sticking down, then we broke for our packed lunches!  I had made a very mundane cheese sarni with tomatoes on the side (I don't do kitchen stuff!)


The paint-filled afternoon brought everyone's creation to life - quite a few boxes were used as a base, as well as some mirrors.


As I would be die-cutting items to order, I needed to pre-prepare something for my demonstration piece. I used a canvas board, and prepared it up to the point of paint application.

I used some printed tissue as part of the background, then added some air dry clay pieces, and die-cuts - including some lettering this time. Plus some flat backed pearls, wooden hearts, a glass butterfly bead, and some metal bits.


I didn't finish it on the day, but made some time this morning to do the finishing touches. Obviously blue played a big part! plus a little dry-brushed pearl paint, and some gilding wax.


Here is the gallery of everyone's creations -

Julie's lovely textured box

Kath's knitting needles box (with guardian lizard)

Kuni's sea themed mirror (the fish are oval beads with heart shaped tails - brilliant!)

Lesley's pearly shell garland (love the subtle colours)

Linden's eclectic mix in white (fab pearl lizard)

Pam's vibrant box (beautiful colours)

Rebecca's fabulous floral mirror

Sue's little bit of steampunk
(note the lips! if you focus on the lips you actually see a face - well I can anyway!)
Apologies to Liz - so sorry, somehow I managed to miss taking a photo of your stunning shell mirror!

Happy Easter to everyone.

Sunday, 13 April 2014

Heart of Eden

When I recently did the MDF garland shape, (see here), I really enjoyed working on MDF and using a different shape.

So, recently purchased an MDF heart shape, which is about 10 inches by 10 inches at the widest points - a good surface area to work with.

I covered the whole surface with crumpled tissue first, and wanted to try using sequin waste as part of the textured background too.


I deliberated chose a theme this time, the Garden of Eden, and let it evolve from there.

Components include chipboard die-cuts (I save the backboards from note pads etc.), molded clay pieces using airdry clay and airdry paper clay, a plastic snake (from my creepy crawlies box), some wooden stars, and bits from my bits box!


Instead of opting for a colour straight away as the initial all over paint layer, I used white. This brought everything together, but also left my options open for colour.


Still staying neutral, used grey to quieten down the glaring white, and start creating shadows and tones.


Now for the colour, and I went for shades of orange and pink.  In the picture is the start of several layers.

The blues stayed in the box!


I'm addicted to gilding wax, so that was the final application, although I did use a little more after sealing it with 3 layers of satin glaze.

The light now bounces off the gilding wax and the glaze, and creates different looks in different lights, which is impossible to capture by camera.  I'm liking the sequin waste too!


Happy Sunday!

Saturday, 30 November 2013

Escape the machine!

Time for another creative get-together!


Here is the occasionally featured Craftroom Work in Progress Snapshot (CWIPS)  - quite tidy really - and the first mince pies of the season!


A couple of weeks ago I used up an opened pack of paper clay and made quite a few faces, so decided to use some of those.  I also had a need to be a little bit steampunk!


Started with a few die-cut cogs and paste through stencils.  There is also a couple of pieces from a paper doily - quite subtle so doesn't really show here.


I forgot to take a photo before applying any paint, so the canvas has had the first coat of paint here.

A few faces, beads, and metal charms.


After more layers of paint and some gilding wax ..... a close-up.

You can see the edge of the doily.


Escape the Machine!
Steampunk urge satisfied!

Saturday, 7 September 2013

Mouldy stuff!

We thought we would have a go at making our own silicone moulds, as the bespoke stuff you can buy is so expensive.

Take some bathroom silicone (I got some small tubes at the pound shop) and cornflour (though you can use talc), plus some petroleum jelly, and latex gloves (optional).

Cover your hands (with or without gloves) with petroleum jelly.  Start combining the silicone and cornflower with an old credit card or similar (also cover the card in pet jelly), then switch to using your hands. Continue kneading until it is malleable, with no cracks, and not sticky.  Proportions are about 50/50 silicone and cornflour.  This takes longer than you may think, but don't overwork it, as the silicone will start to dry out.

Then press anything into it that takes your fancy, but make sure the item is also covered in petroleum jelly to stop it sticking.


Here are some I did, a bee from a keyring, and old metal button from my mother's button box, and a couple of plastic things that I thought would be useful as wings.


This is everything we did with 3 tubes of silicone, and we did waste some because of overworking.

There are some more buttons, a plastic bird, tiny plastic sewing related charms, Ideology frames, and a pendant.


It was a hot day, so we put the tray in the sunshine, but we were a bit impatient, as we probably took the items out before the silicone had cured.

I would suggest 24 hours, even though it may feel "done" before that.

Each time you use a mould, cover it in petroleum jelly to act as a release agent.


I used some paper clay to try them out, here are the results before paint and stuff.  The good thing about paper clay is you can trim it once dry.

The button is fab, as are the wings and bird.


I'm going to do the bee again, as I didn't press it into the silicone evenly, so one wing is a bit off.  The pendant didn't go in deep enough either, nor did the Ideology frame.  The anchor button is not too good either, so will repeat that too.


To see how much detail had been picked up by the silicone, I painted everything black, and added some gilding wax.

This definitely works, but care must be taken to press shallow items deep into the silcone, and also ensure larger items are pressed in evenly.


I really love this technique, and will be searching around for other stuff to make a mould from!


Thursday, 13 June 2013

Clockwork tree .....

I so enjoyed the canvas I did using clay pieces  (see Playtime post of 12 May), that I wanted to do another one, this time, using a large box canvas.  I recently bought some new clay molds, and I also had some pieces left over from last time.

Here are the bare bones of the canvas, before I added much paint.  I did put some background paint on first to identify the below ground part.


The tree is corrugated card, with added cord and string for lianas, clay stones and timepieces, and I just love the fern mold.  Included a couple of die-cuts too. The stones are embedded in Decoart Texture Fierro paste - it's brown in colour and has bits in that look like iron filings and glint in the light.

Then I embarked on countless layers of paint.  I kept going back to this canvas, as it was never quite right, then I added some Pumpkin Soup (Fresco paint) to create a dawn.  Now I'm happy!

Here are some close-ups.


Here is the finished piece .....


I've decided a box canvas is not the right thing for adding stuff like clay, because it is too bouncy!  I like the firmness of canvas board, but I like box canvases for their dimension - what to do??  I did some research, and I have come up with something that may fit the bill.  Watch this space, as I'll use it for my next canvas - hope it works!!


Sunday, 12 May 2013

Playtime!

Love it when the bell goes for playtime!  Spent a fabulous day yesterday with two good (and arty) friends, creating a canvas using some airdry clay pieces.

I have been moving more and more towards dimension on a canvas, and I suppose clay was the next obvious thing to try.

We had prepared the clay pieces beforehand, to allow time to dry.  And, believe it or not, I purposely did not take any blue paint with me!  I did feel a little bereft, and I could have borrowed some, but   ... onwards without blue I said - only for a day though!

I used not only some clay pieces, but also corrugated cardboard and some string.  The clay needed the addition of a little extra glue to ensure it stayed in place.  Forgot to take a photo before any paint went on, but here it is after the first, all over, layer of paint.


Some time later, after lots of layers of my favourite Fresco paint, and a little guilding wax ... decided to name this canvas The Gilded Frog.


A couple of close-ups -


Linda went for an autumn theme, using not only clay pieces, but die-cuts too.  Love the colours.


And Rose lived up to her name with a stream of pinks, reds and a hint of blue.   Dry brushing the clay flowers and adding gilding wax, really highlights the textures.


Good company, lots of laughs, and lots of paint - what more could a girl ask!