We shall not cease from exploration
And the end of all our exploring
Will be to arrive where we started
And know the place for the first time.
"Little Gidding"
T S Eliot

Friday 27 September 2013

Alice in a pea green boat

When I was doing my Little Bit of Gothic canvas, it brought to mind the novel Gormenghast, which is why I included an extract from it in the post (15 September).   This further reminded me that way back in the mists of time, when I first wanted to have a go at a canvas, I had great difficulty in starting it.  It is said there is nothing scarier than a blank canvas.  So, I took inspiration from literature and poetry.

Just taking a snippet from The Owl and the Pussycat got me going.  Looking at these first two canvases now, they are a bit clumsy, but, for posterity's sake, here they are, together with the quotes that inspired them.

The Owl and the Pussycat
And hand in hand, on the edge of the sand,
They danced by the light of the moon.

Alice Through the Looking Glass
Why, sometimes I've believed as many as
six impossible things before breakfast.
(The White Queen)

I included the words on the canvas, and even back then was using found items, like broken jewellery and watch parts.  The clay faces were made in moulds.

So, if you get stuck for inspiration, look at the written word, be it in literature, poetry, or song lyrics.

Saturday 21 September 2013

The folding stuff .....

I recently purchased some origami paper squares on the Festival of Japan stand at the Sandown Crafts show earlier this month, and had a go at making a small version of the dahlia flower I did earlier (see post of 3 August).

The final diameter of the flower is twice the diameter of the paper circles used. I was probably being a bit ambitious to try one inch circles, but I did manage to do 1.25 inch circles.  Bit fiddly, but using the proper paper made such a difference, as it is very easy to fold.  The paper is patterned one side with a plain co-ordinating colour on the reverse.  I made two flowers, using the same paper, but switched the sides around. Then made a quick card with them.

I think this smaller size is very effective and looks prettier on a card than the larger version.  Instructions can be found on the Origami Maniacs blog - here.

Whilst on origami, also found these delightful bows.  There is one step which is a bit tricky, but I think they are fabulous for decorating pressies.


The dark blue one was my first attempt, so a little crumpled!  Again, instructions can be found on the same blog - here.

Happy folding!

Sunday 15 September 2013

A little bit Gothic .....

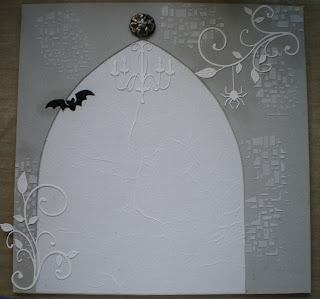
I had real fun doing this one.  As you know I love steampunk, but I also lean a bit towards Gothic.  It started with another sort out of a box of stuff, and I came across some skeleton leaves (which I've had for years), and my thought processes led me to this canvas.  I used another 12 x 12 canvas board.

To begin I covered the middle of the canvas with scrunched tissue paper - I do like starting with this as it adds instant texture, but not too much!  I then cut a Gothic arch frame out of grungeboard, fortunately I had a 12 x 12 piece of grungeboard, so it fitted the canvas perfectly.  I also die-cut some other pieces out of hot pressed watercolour paper or chipboard, and used the recently made button mould (see previous post).

I scraped some modelling paste through a stencil for stone-like texture, and I stuck everything down that I wanted to include in the initial background painting, before giving it all one coat of grey Fresco paint (Elephant).


Meanwhile, I made a dress out of the skeleton leaves.  Here it is in its raw state.  It was a bit tricky, as the leaves are such delicate things, and I did ruin a few!  The trick is to add a tiny bit of glue at a time, and just build up the leaves and glue - slowly!

The belt is made from the wings of a die-cut bat that I wasn't going to use in its bat form!


Once it was completely dry, I used some Pewter Fresco paint; this separates in the bottle, and doesn't mix no matter how hard you shake it - so I just blobbed some out with a stick, and used a piece of foam to dab it on.  I had a rummage in my box of embossing powders, and decided to use silver, and  some interference colours.  Again, had to be really careful heating it, as it starts to smoke quite quickly and I didn't want my carefully crafted dress to go up in flames!  I covered the back of the dress with matt medium to stabilise it.

The photo doesn't capture all the colours and light reflections, but you get the idea!


Back to the canvas, and the usual several layers of paint, until I was happy.

All Fresco paints - the centre portion consists of London Night, Vintage Lace and some French Roast.

On the outer part I used Pea Coat, Eggplant, Holly and French Roast.


I die-cut the raven but had the chipboard potions bottle, and the skull.  I also used some embossing powder on the potions bottle.


A final coat of matt medium, and here is my little bit of Gothic.


“Gormenghast. 
Withdrawn and ruinous it broods in umbra: the immemorial masonry: the towers, the tracts. Is all corroding? No. Through an avenue of spires a zephyr floats; a bird whistles; a freshet beats away from a choked river. Deep in a fist of stone a doll's hand wriggles, warm rebellious on the frozen palm. A shadow shifts its length. A spider stirs... 
And darkness winds between the characters.
- Gormenghast” 

Mervyn Peake

Saturday 7 September 2013

Mouldy stuff!

We thought we would have a go at making our own silicone moulds, as the bespoke stuff you can buy is so expensive.

Take some bathroom silicone (I got some small tubes at the pound shop) and cornflour (though you can use talc), plus some petroleum jelly, and latex gloves (optional).

Cover your hands (with or without gloves) with petroleum jelly.  Start combining the silicone and cornflower with an old credit card or similar (also cover the card in pet jelly), then switch to using your hands. Continue kneading until it is malleable, with no cracks, and not sticky.  Proportions are about 50/50 silicone and cornflour.  This takes longer than you may think, but don't overwork it, as the silicone will start to dry out.

Then press anything into it that takes your fancy, but make sure the item is also covered in petroleum jelly to stop it sticking.


Here are some I did, a bee from a keyring, and old metal button from my mother's button box, and a couple of plastic things that I thought would be useful as wings.


This is everything we did with 3 tubes of silicone, and we did waste some because of overworking.

There are some more buttons, a plastic bird, tiny plastic sewing related charms, Ideology frames, and a pendant.


It was a hot day, so we put the tray in the sunshine, but we were a bit impatient, as we probably took the items out before the silicone had cured.

I would suggest 24 hours, even though it may feel "done" before that.

Each time you use a mould, cover it in petroleum jelly to act as a release agent.


I used some paper clay to try them out, here are the results before paint and stuff.  The good thing about paper clay is you can trim it once dry.

The button is fab, as are the wings and bird.


I'm going to do the bee again, as I didn't press it into the silicone evenly, so one wing is a bit off.  The pendant didn't go in deep enough either, nor did the Ideology frame.  The anchor button is not too good either, so will repeat that too.


To see how much detail had been picked up by the silicone, I painted everything black, and added some gilding wax.

This definitely works, but care must be taken to press shallow items deep into the silcone, and also ensure larger items are pressed in evenly.


I really love this technique, and will be searching around for other stuff to make a mould from!


Wednesday 4 September 2013

A little bit of magic ..... with Alice

Having a busy time this week,  so not much crafting going on, but .....

I know that if you find a perfect feather it means good luck - well, the other day there was a perfect feather on my doorstep (in fact it is still there).  That same day I found out I had won some feather stamps from Paper Artsy ..... spooky or what!

I'm an avid follower of a few blogs, including the Paper Artsy one, as I love all their stuff.  It is their 10th birthday this month, so there has been lots of posts with loads of inspiration, and a few blog candy draws - and I won these -


I love them, and I can't wait to incorporate these images into a project.

On Monday, had a day out to Buckingham Palace.  Four of us went and it didn't disappoint!  We did the State Rooms tour which included the Coronation Exhibition, showing some of the costumes and associated paraphernalia- really interesting.   Most of the palace's internal decoration by architect John Nash (19th century) still remain, and are stunning; as are all the paintings and knick-knacks (can I describe them as that?!).


Here we are at the end of the tour, which exits onto the garden (39 acres), where there is a cafe for snacks, and of course, a shop!


View from the garden.


Loved this old, knarled tree in the gardens - is it the whomping one from Harry Potter?


Looking back across a pond (or would that be a lake?).

Then off for a bit of lunch at Wagamama in Victoria Street.

Perfect day!


Long may the magic continue!
Happy sunny September.