We shall not cease from exploration
And the end of all our exploring
Will be to arrive where we started
And know the place for the first time.
"Little Gidding"
T S Eliot

Thursday 31 October 2013

Halloween melt .....

I just want to say thank you for all the lovely comments people have been leaving - I'm tickled pink you like what I do!  Though maybe that should be tickled blue!  Can I also say welcome to new followers.

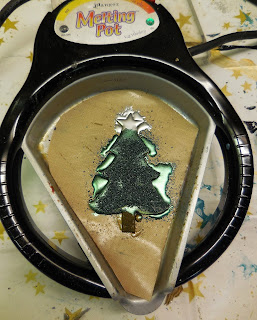
Last night at the Ashtead Club I demonstrated making Christmas baubles with the melt pot for use as hanging ornaments or embellishments on cards.  See previous post.

But, it was the night before Halloween (would that be Halloween eve?!?), so I had to acknowledge that fact!

At the weekend I found some cheap Frankenstein bolts on a headband - which reminded me of my steampunk obsession, so I gathered together some die-cut cogs which I spritzed with grungy colours and (plastic) spiders .....


Whipped out my trusty glue gun, and hey presto .....


Here is its debut .....


We had lovely meltpot fun - here are some action photos .....


More photos of what everyone did will be on the Ashtead Club blog in due course (link on sidebar).

So Happy Spookiness (with a Christmas twist!).

Friday 25 October 2013

Christmas melt!

At next Wednesday's Ashtead Craft Club evening workshop, I will be demonstrating the Melt Pot; with a Christmas theme (oh no! - not Christmas again!).

Decided to use basic die-cut chipboard shapes which can create hanging baubles or card embellishments.  I also pre-punched a hole for the hanging ones.

So that everyone can do their own colour combinations of  UTEE, I used the "craft sheet in the melt pot" method.

I placed a wood block under the back of the melt pot to lift it up slightly, and make it level (otherwise the UTEE will just run backwards off the shape).

A piece of craft sheet is cut to fit the melt pot; then add the chipboard shape and  sprinkle UTEE.

I did colour the chipboard shape first with Distress Ink.  And to make the coloured UTEE go further, sprinkle on clear UTEE first.


When melted, carefully lift the craft sheet out - I use two pairs of tweezers.  Then, I immediately stamped into it, to create fab texture.  Leave to cool a bit, then peel off the stamp.


Here's all the shapes I ended up with.


Add glitter, mica powders, ribbon - anything desired!  For the baubles I stuck 2 shapes back to back.

Here are  some of my finished baubles and cards.

Small tree - big baubles!


Happy tinsel time!

Friday 18 October 2013

Who said that?

For many years now I have collected quotations and sayings, and apart from using some for artwork inspiration, I use them on cards too.

Here are some of my favourites.


Love the background on this one.  I used a water droplets stamp - another fab design from Designs by Ryn .

The humming birds are die-cut from a scrap piece of card that I had used for experimental paint effects.


This next quote my mother had framed on her bedroom wall, and I never knew where it was from - I don't think she did either.

I now know is is from Lord of the Rings by J R R Tolkien.

I had some organza flower ribbon, so cut that up, used some die-cut leaf swirls and a gate stamp (which I think is by Paper Artsy).


These words are so true ..... and something I had to get over!

Love this Memory Box die - cut out of black card, with another cut out of white card and slightly offset.


It is not only quotes that inspire, sometimes I see something that takes my breath away. This sunrise was earlier this week - it only lasted a few minutes - but that is all the time I needed - though I nearly fell down the stairs racing for my camera!


Friday 11 October 2013

Waxing not waning!

I'm still experimenting with encaustic art, there is something very compulsive in seeing how the wax reacts with pressure and heat - well, anyway - it pleases me!


So I made some more cards using different silhouette stamps this time.

Creating an undersea grotto is the easiest effect to achieve when starting out.

I used some new fish silhouette stamps, which I love.  They are really deeply etched rubber stamps from Designs by Ryn, a fabulous stamp designer in Canada.


I then had a go at some landscapes, using trees as the stamped image.  This was more tricky, and I did get quite frustrated - one eventually found its way into the bin - completely beyond help!


All these were created quite by accident, as I didn't really know what I was doing!


I like the sky in this one.  And is an example of why I love this technique, its unpredictability!


This one is my favourite, it has an ethereal quality not captured by the camera.


Much more practice needed now, and I will try starting with a completely blank card, with no stamped images.

Just seen a rainbow so happy Autumn!

Friday 4 October 2013

Waxing lyrical .....

Some time ago, at the Ashtead Craft Club, we were introduced to encaustic art, and I loved it.  This technique uses pigmented wax which is melted onto the base of a hot encaustic iron.  The wax is then "painted" onto the card to create fabulous effects.

At the time I bought some wax blocks (I already had the iron which I used as a craft iron), and had a go at home.  I then moved onto other things, but sometimes it is good to revisit things, and I found my wax blocks the other day.  Which just proves that my craft room is not as tidy as it should be, but on the other hand it is fun to suddenly discover something I forgot I had!

So I had another go, using some sihouette stamps as thestarting point.  Because I'm not an expert, I never know how it is going to turn out, and if I don't like how it is progressing, I just swipe the iron over the card again to smooth the wax out.

This is what I ended up with.


And I made some cards.


I'm loving this at the moment, so I'm going to search out other silhouette stamps and do some more; though I would love to learn some more tips and tricks for this technique.

Happy waxing!